
You’re in the middle of a virtual meeting, you share your screen to play a short video, and then someone says, “We can’t hear anything.” Sound familiar? It happens to almost everyone at least once.
Don’t worry! Sharing your screen with audio is easy once you know where the right toggle is. The problem is that Zoom, Google Meet, and Microsoft Teams all hide it in a different place, and a few computer settings can quietly block the sound.
In this guide, I’ll show you how to share your screen with sound in all three apps, on desktop and mobile.
You’ll also learn why HD screen sharing matters, how to keep your shared screen sharp, and how to fix the most common problems, like no sound, echo, or a black screen.

So, let’s get started.
What Is Screen Sharing in a Video Meeting?
Screen sharing lets other people in a meeting see what’s on your screen in real time. You can share your entire screen, a single app window, or just one browser tab. Most apps also let you share the sound your computer is playing, like a video, music, or a demo with audio.
By default, though, most apps share only the picture. If you want people to hear what’s playing, you have to turn on the audio option yourself. That’s the step most people miss.
Quick Answer: Where Is the Audio Option?
- Zoom: Click Share, pick your screen or window, and check Share sound before you click Share.
- Google Meet: Click Present now, choose A tab, and keep Also share tab audio turned on.
- Microsoft Teams: Click Share and turn on the Include sound toggle before you pick what to share.
Why Is HD Screen Sharing Important?
HD (high-definition) screen sharing makes remote collaboration, virtual meetings, and presentations clearer and much more effective.
Here are the main reasons high-quality screen sharing matters:
Clarity and Detail
HD screen sharing ensures that the content being shared, be it presentations, documents, images, or videos, is displayed with optimum clarity and detail. It helps participants follow complex details without guessing.
Engagement
High-quality visuals engage participants and keep them focused on the content being shared. Engaged participants are more likely to actively participate, ask questions, and contribute to the discussion.
Effective Communication
Visual aids play an important role in communication. HD screen sharing allows you to effectively convey ideas, concepts, and data, making it easier for participants to grasp and remember information.
Professionalism
When presenting to colleagues, clients, or partners, high-quality visuals convey professionalism and attention to detail. Clear visuals show that you’ve taken the time to prepare and ensure a polished presentation.
Collaboration and Feedback
When collaborating on documents, designs, or projects, HD screen sharing enables participants to provide feedback in real time. They can point out specifics and suggest improvements, encouraging efficient collaboration.
Data Visualization
In presentations involving charts, graphs, and data visualization, HD screen sharing ensures that all data points and labels are legible. This is essential to convey insights accurately and share data with participants.
Sound That Matches the Picture
A sharp screen is only half the job. If you’re showing a product video, a training clip, or a song, people need to hear it clearly too. Sharing your computer audio sends that sound straight into the meeting, so it’s much cleaner than holding your phone up to the mic or letting your speakers leak into your microphone.
What Do You Need Before You Share Your Screen?
A few minutes of prep can save you from an awkward moment in front of everyone. Check these things before your meeting:
- The latest app version. Update Zoom, Teams, or your browser. Older versions often have audio sharing bugs.
- Screen recording permission on a Mac. Go to System Settings > Privacy & Security > Screen & System Audio Recording and turn it on for Zoom, Teams, or Chrome (Apple explains how). If you skip this, people will see a blank screen or only your wallpaper.
- The right speaker selected. Your computer and your meeting app should use the same speaker or headset. If they don’t match, the shared sound may not go through.
- A headset or headphones. If you play sound through your laptop speakers, your mic can pick it up again and cause an echo.
- A stable connection. Zoom says normal screen sharing uses only about 50 to 150 kbps, and shared sound adds 80 kbps (mono) or 160 kbps (stereo). A moving video needs a lot more. Check our video conferencing requirements if your calls often lag.
- Clean up your screen. Close private tabs, turn on Do Not Disturb, and hide notifications. Remember, people see everything you share, including pop-up messages.
How to Share Your Screen with Audio in Zoom?
Zoom has the most options of the three. You can share sound with your screen, or share only your computer audio without showing anything. Here’s how it works in the Zoom desktop app:
On Windows, Mac, or Linux
- Start or join a Zoom meeting.
- Click Share in the meeting controls.
- Select the screen or app window you want to share.
- Check the Share sound box at the bottom of the share window.
- Optional: Click the small arrow next to Share sound and choose Stereo (high fidelity) if you’re sharing music.
- Click Share.
Forgot to check the box? No problem. While you’re sharing, click More in the share toolbar and select Share sound. You don’t need to stop and start again.
If you’re sharing a full-screen video, also check Optimize for video sharing. Only use it for video, though. Zoom itself warns that it can make normal screens like slides or documents look blurry.
Share Only Your Computer Audio (No Screen)
Want to play background music or an audio clip without showing your screen? Click Share, open the Advanced tab, choose Computer audio, and click Share. People will hear whatever your computer plays, but they won’t see your screen.
On the Zoom Web App
If you join Zoom from Chrome, click Share Screen, pick the Chrome Tab option, and keep Share tab audio checked. Browsers usually share sound only from a tab, not from a full screen.
On Android and iPhone
- Android: Tap Share, then Screen, and start sharing. Then tap Share Audio in the sharing controls. Tap it again to turn it off.
- iPhone or iPad: Tap Share, then Screen, and tap Start Broadcast. On the sharing screen, make sure device audio is turned on.
I recommend doing a quick test with a friend before an important call. And if you also want to save the session, here’s how to record a Zoom meeting on a free account.
How to Share Your Screen with Audio in Google Meet?
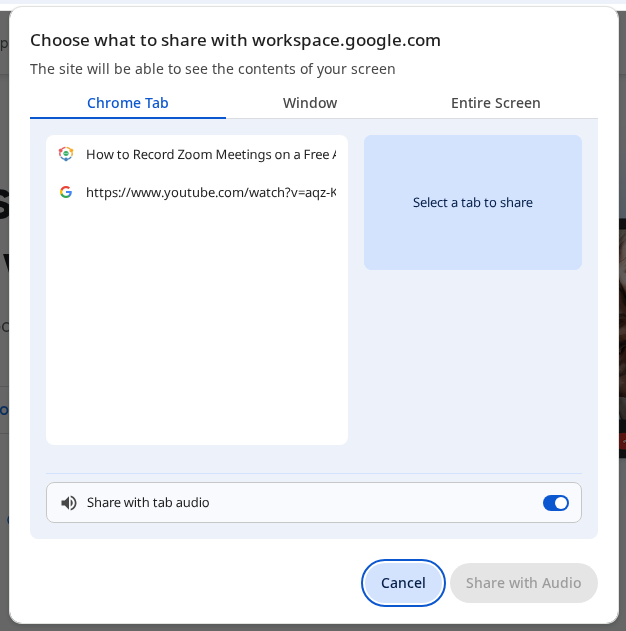
Google Meet runs in your browser, so screen sharing works through Chrome’s share window. The key thing to know: according to Google, the most reliable way to share sound is to present a tab, not your whole screen.
Present a Tab with Audio (Best Option)
- Open the video or slides you want to show in a new Chrome tab.
- Join your Google Meet call.
- Click Present now (the screen icon with an arrow) at the bottom.
- Choose A tab.
- Select the tab with your video and keep Also share tab audio turned on.
- Click Share.
Want to switch to another tab without stopping? Go to that tab and click Share this tab instead on the banner at the top.
Present a Window or Your Entire Screen
You can also share a window or your entire screen. On some computers, Chrome shows an Also share system audio toggle for this. But on many setups, like the one below, it simply tells you to share a tab if you want sound.
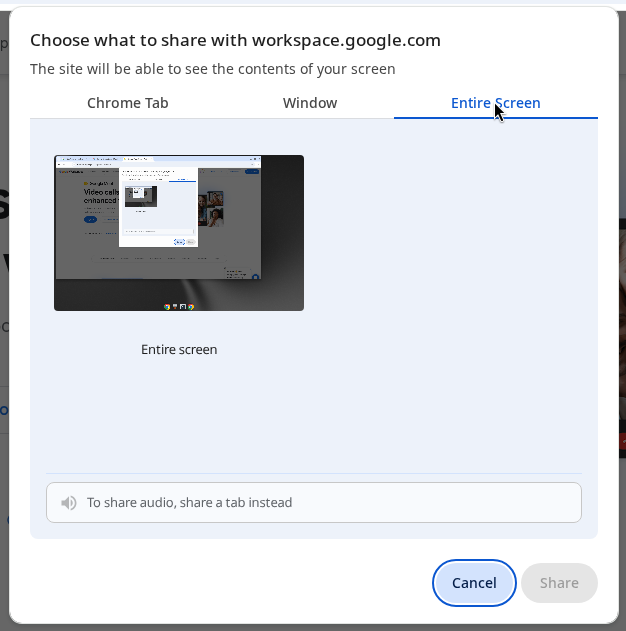
So if your audio matters, use the tab option. It’s also kinder to your internet connection, because Chrome only has to send one tab instead of your whole desktop.
A Few Meet Tips
- Don’t present the Meet tab itself. You’ll get an endless mirror effect. Share a different tab or window instead.
- Use Chrome or Edge on a computer. Other browsers have fewer audio sharing options.
- On macOS Sequoia and later, click Allow when Chrome asks for screen and audio recording permission.
- If you see a different speaker selected in Meet, switch to your system default speaker to avoid echo.
- A meeting can have up to 10 people presenting at the same time, so you don’t need to wait for someone else to stop.
How to Share Your Screen with Audio in Microsoft Teams?
In Teams, the audio option is a simple toggle in the share menu. Here’s what Microsoft recommends:
On Windows and Mac
- Join your Teams meeting.
- Click Share in the meeting controls.
- Turn on the Include sound toggle.
- Choose your screen, a window, or a PowerPoint file to share.
Already sharing? Move your mouse to the top of the screen, where it says you’re sharing, and click Share audio in the sharing controls. Click it again to stop sharing sound.
Keep in mind that Teams shares all sound from your computer, including notification sounds. Mute chat apps and email alerts before you start.
Install the Audio Driver on a Mac
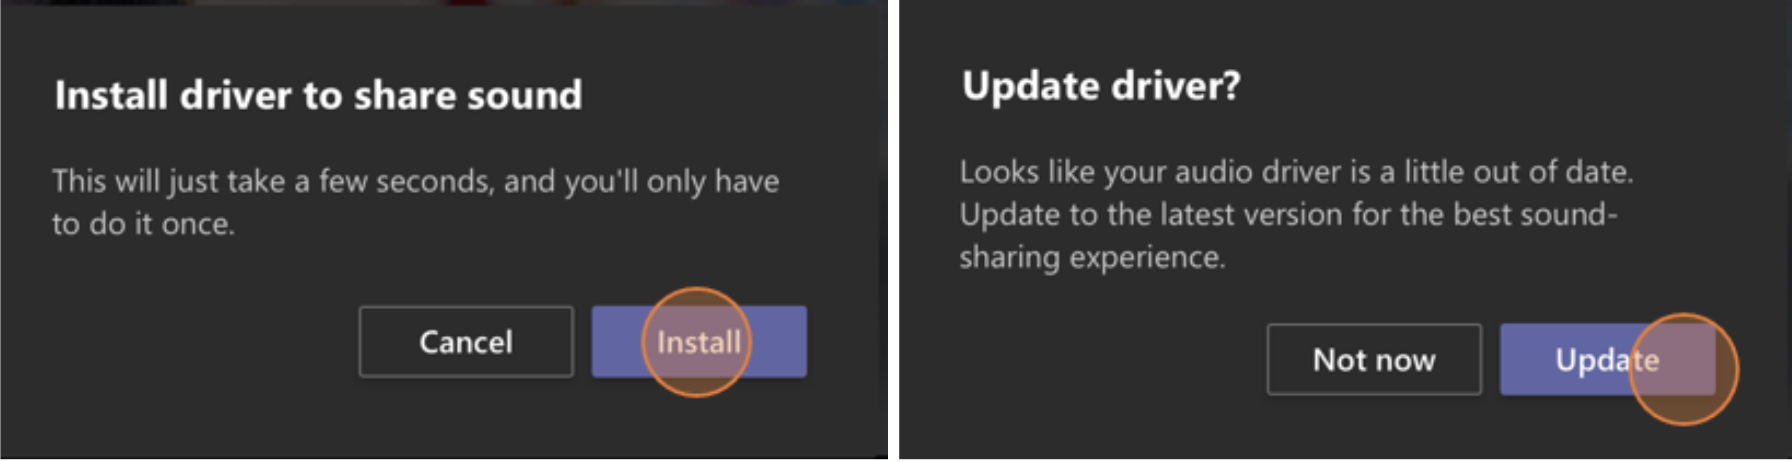
Mac users need one extra step. The first time you share sound, Teams asks you to install its audio driver. Click Install, wait a few seconds, and restart your Mac if it asks you to. If it says the driver is out of date, click Update.
Fix Low Volume on Windows
Does your shared video sound very quiet? Windows automatically turns down other sounds during calls, and that includes your shared audio. To fix it, open the Sound Control Panel, go to the Communications tab, select Do nothing, and click Apply.
On Android and iPhone
Tap Share, then Share screen and Share screen with audio, and tap Start Broadcast. This needs Android 10 or later, or iOS 13 or later.
In a Meeting Room with a Teams Device
If you plug your laptop into a Teams Room with a cable, the sound won’t come through. Instead, join the meeting from your laptop with Audio off, then share with Include sound on. Keep only one mic and speaker active in the room to avoid echo.
Using the free version of Teams? Screen sharing with sound works there too. See our full list of Microsoft Teams free features and limitations.
How to Make Your Shared Screen Look Sharp?
Nobody likes squinting at a blurry spreadsheet. Here are a few simple things that make a real difference:
- Share a window, not your whole screen. It sends less data, so the picture stays clearer, and it hides your other apps.
- Zoom in on your content. Increase the font size or browser zoom to 125% or 150%. Small text gets hard to read after compression.
- Lower your screen resolution on a big monitor. A 4K or ultrawide screen gets scaled down for viewers on laptops, so text looks tiny. Sharing a single window avoids this too.
- Use the video option only for video. Zoom’s Optimize for video sharing makes motion smoother but text softer. Turn it off for slides and documents.
- Turn off your camera if your internet is weak. Your screen share is usually more important than your face when you’re presenting.
- Use a wired connection. An Ethernet cable is more stable than Wi-Fi, especially when you’re sharing a video.
Screen Sharing Audio Not Working? Here’s How to Fix It
Did you follow the steps but people still can’t hear anything? These are the most common causes and their fixes:
Nobody Can Hear the Audio
- Check that you turned on Share sound, Also share tab audio, or Include sound. It’s off by default.
- Make sure the video or music is playing through your default speaker, not a Bluetooth device or another output. Zoom suggests testing with your built-in speakers.
- In Google Meet, switch from sharing a window or screen to sharing a tab.
- On a Mac, install or update the Teams audio driver, and give Zoom or Chrome screen and audio recording permission.
- Restart the app after you change any audio setting. Zoom also has a detailed audio sharing troubleshooting guide.
There’s an Echo
An echo usually means the sound is coming out of your speakers and going back into your microphone. Use headphones, or mute your mic while the video plays. In a room with several people, only one device should have its mic and speaker turned on.
People See a Black Screen
This is almost always a permission problem on a Mac. Open System Settings > Privacy & Security > Screen & System Audio Recording, turn on the app, and restart it. On Windows, try sharing a single window instead of the whole screen, or update your graphics driver.
The Video Is Choppy or Out of Sync
Close other apps and browser tabs, pause big downloads, and turn off your camera while the video plays. If it’s still choppy, send the link in the chat and let everyone watch it themselves. Sometimes that’s simply the better option.
Conclusion:
Sharing your screen with audio isn’t hard. You just need to know where each app hides the option. In Zoom, check Share sound. In Google Meet, share a tab with Also share tab audio turned on. In Teams, turn on Include sound, and if you’re on a Mac, install the audio driver once.
Before an important meeting, I recommend a short test call. Check your sound, your permissions, and how your screen looks on the other side. It takes two minutes and saves you from the classic “Can you hear it now?” moment. For more tips on presenting well, read our guide to virtual meeting etiquette.
Did this guide help you share your screen with sound? Please leave a comment below and give this post a star rating. If you still have a problem, feel free to contact us. We’ll be happy to hear your thoughts, thanks.