

Have you ever joined a virtual meeting from a noisy cafe, or with a colleague who has a strong accent or a bad microphone? It’s easy to miss half of what people say. That’s exactly where live captions help.
Live captions turn speech into text on your screen in real time.
They’re a must for people who are deaf or hard of hearing, and they’re also great for anyone learning a new language, joining from a busy place, or just trying to keep up in a long call.
As we explain in our guide on the features a virtual meeting platform should have, accessibility tools like this are no longer optional.
In this guide, I’ll show you how to turn on live captions in Zoom, Google Meet, and Teams on a computer and phone, how to change the caption language and style, and, most importantly, which caption features are free and which need a paid plan. When someone tells me they can’t follow a call, captions are one of the first settings I check, because they take seconds to turn on.
Are Live Captions Free in Zoom, Google Meet, and Teams?
Yes, basic live captions are free in all three apps. The paid part is usually translated captions, where the app shows the captions in a different language from the one being spoken. People mix these two up a lot, so here’s the difference. For everything else the free plans include, see our Zoom vs Google Meet vs Teams Free comparison.
Live captions vs translated captions at a glance:
Now let’s turn them on in each app.
How to Turn On Live Captions in Google Meet?
Google Meet has the simplest captions of the three. They’re free for everyone, they’re turned on only for you, and, according to Google Meet Help, they support dozens of languages, including Bengali, Hindi, Urdu, Arabic, and Spanish.
On a Computer
- Join your meeting in Google Meet.
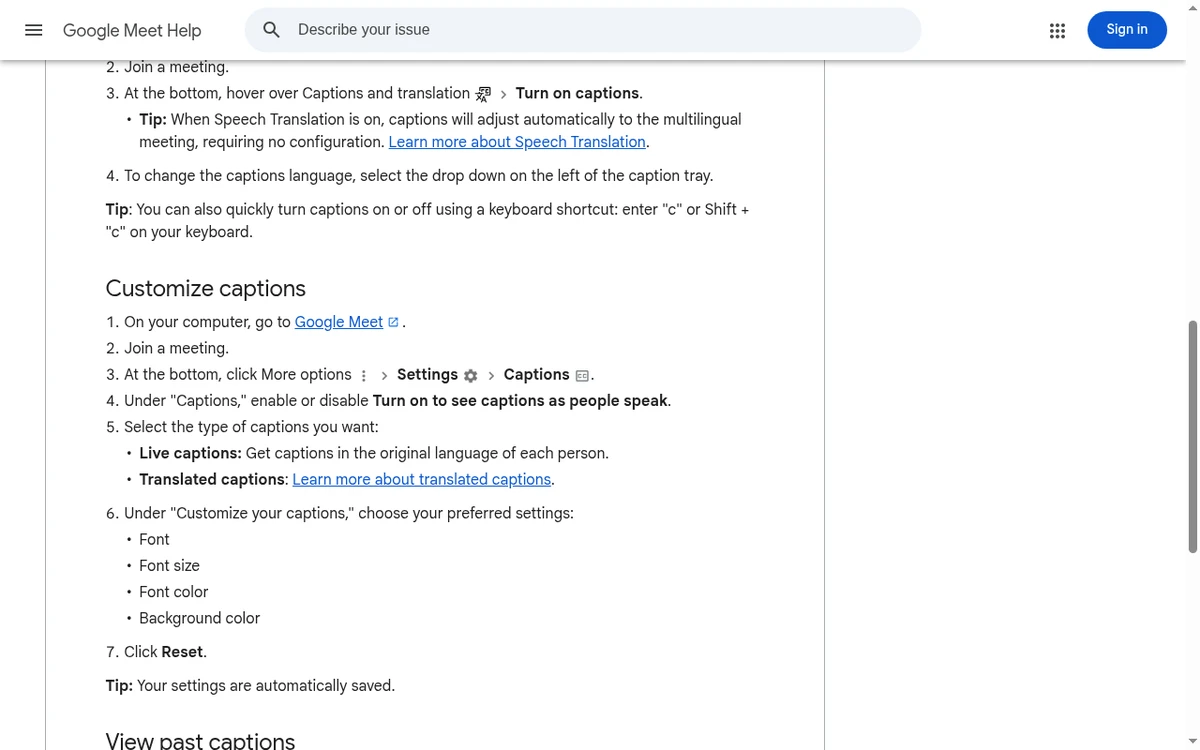
- At the bottom, hover over Captions and translation and click Turn on captions.
- To change the language, use the drop-down on the left side of the caption area.
- To turn captions off, click the same button again.
Shortcut: press c (or Shift + c) on your keyboard to switch captions on or off quickly. You can also scroll up in the caption area to read what was said earlier, for the time you’ve had captions on.
Customize Captions in Google Meet
- Click More options > Settings > Captions.
- Under Captions, turn on Turn on to see captions as people speak.
- Under Customize your captions, choose the font, font size, font color, and background color.
On a Phone
In the Meet app on Android or iPhone, tap the screen during the call, tap More options, and turn on Captions. You can pick the caption language from the same place.
Translated Captions in Google Meet
Translated captions let you read someone speaking English in Spanish, or someone speaking Bengali in English, for example. They’re available only with certain paid Google Workspace editions and Google AI plans, not free personal accounts. When available, hover over Captions and translation, turn on captions, choose Translated captions, and pick the “Translate from” and “Translate to” languages.
Google also has a newer Speech Translation feature that translates people’s voices, not just text. It’s limited to certain paid plans, so check your plan before you rely on it.
How to Turn On Live Captions in Zoom?
Zoom calls them automated captions. According to Zoom Support, they’re turned on by default for paid accounts, and some accounts may not have them. If you’re a participant and the host allows captions, turning them on is easy.
On a Computer
- Join the meeting in the Zoom Workplace desktop app.
- In the meeting controls, click Show captions. If you don’t see it, click More first.
- Captions appear above the meeting controls, labeled with each speaker’s name.
- Hover over the captions and click the gear icon to change Caption language, open Caption settings, or Pop out the captions into a separate box.
Note that in Zoom, the caption language applies to everyone, because it tells Zoom which language people are speaking. If someone sets the wrong language, the captions will be nonsense, so check that first if captions look strange.
On a Phone
- Join the meeting in the Zoom Workplace mobile app.
- Tap More in the meeting controls.
- Tap Show CC. Captions appear above the controls.
If You See “Request Captions” Instead
Some hosts let only themselves or co-hosts turn on captions. In that case, click Request captions (or Request CC on a phone), then Send. The host gets a pop-up and can approve it. You can find all the details in Zoom’s guide to viewing captions in a meeting.
For Hosts: Enable Automated Captions
- Sign in to the Zoom web portal and open Settings.
- Click the Meeting tab.
- Under In Meeting (Advanced), turn on Automated captions.
- Optional: click the pencil icon to choose which languages are available.
Tip: In the desktop app, go to Settings > Accessibility and turn on Always show captions in meetings and webinars, so captions appear automatically whenever the host allows them. I turn this on for anyone who uses captions every day, so they don’t have to switch them on in each meeting. Translated captions in Zoom need an eligible paid plan or the Translated Captions add-on.
How to Turn On Live Captions in Microsoft Teams?
Live captions are built into Teams for work, school, and personal accounts, including Teams Free. Each person turns them on for themselves. Here are the steps from Microsoft Support.
On a Computer (Teams for Work or School)
- In your meeting controls, select More actions (the three dots).
- Select Captions.
- To customize, hover over the captions and select Open caption settings, then Caption styles to change the font, size, and color.
- If captions look wrong, the organizer can change the Meeting spoken language in the same caption settings.
In Teams Free and Teams for Personal Use
On a computer, select More options > Language and speech to turn on live captions, as listed in Microsoft’s personal meeting controls guide. If you’re new to the free version, see our guide on how to use Microsoft Teams Free for video meetings.
On a Phone
Tap More options > Turn on live captions. To change how they look, tap More options > Caption style.
Translated Captions in Teams
Live translated captions in Teams meetings need a Teams Premium or Microsoft 365 Copilot license. If the organizer has one of these licenses, everyone in the meeting can use translated captions. Teams doesn’t save captions after the meeting, so if you need a written record, turn on transcription instead.
Live Captions Compared: Zoom vs Google Meet vs Teams
Here’s how the three apps compare for captions:
| Feature | Zoom | Google Meet | Microsoft Teams |
|---|---|---|---|
| Live captions | Automated captions (on by default for paid accounts) | Free for all users | Free, including Teams Free |
| Keyboard shortcut | No default | c or Shift + c | No default |
| Caption language set by | Host or participant (affects everyone) | Each person | Organizer (spoken language) |
| Customize font and color | Yes | Yes | Yes |
| Translated captions | Paid plans or add-on | Paid Workspace and Google AI plans | Teams Premium or Copilot |
| Captions saved after meeting | No (use transcripts) | Only in recordings with captions | No (use transcription) |
Tips for More Accurate Live Captions
- Use a good microphone or headset. Clear audio is the number one factor for accurate captions.
- Pick the right spoken language. Wrong language settings cause most “gibberish” captions.
- Speak one at a time. Captions struggle when people talk over each other.
- Reduce background noise. Turn on noise suppression and mute when you’re not talking.
- Spell out names and jargon. Product names and acronyms are often wrong, so add them to the chat.
- Keep your app updated. Caption menus and languages change often, so install the latest version first. Zoom explains how in updating Zoom to the latest version.
- Test before important meetings. Our guide on testing your camera and microphone helps you check your mic quickly.
Captions are also a big help for students. If you teach online, read our post on the benefits of virtual meetings for students. The W3C’s Web Accessibility Initiative guide to captions explains why captions matter for accessibility.
Captions Not Showing? Quick Fixes
| Problem | Quick fix |
|---|---|
| No captions button in Zoom | Click More. If it’s still missing, the host or admin has turned captions off. Try Request captions. |
| Captions are in the wrong language | Change the caption or spoken language in the caption settings. |
| Captions lag or skip words | Improve your internet connection and use a better microphone. |
| No Translated captions option | Your plan doesn’t include it, or the organizer’s license doesn’t. |
| Captions disappear in every new meeting | Turn on Always show captions in Zoom, or use the c shortcut in Meet. |
In my experience, laggy or garbled captions are usually an audio or connection problem, not a caption bug. If the fixes above don’t help, work through our guide on how to fix common video call problems.
If you want a full written record instead of on-screen captions, see our guide on turning meeting recordings into transcripts, notes, and action items, or read how to record a Google Meet or Teams meeting with captions included.
Conclusion
I hope this guide has shown you how to turn on live captions in Zoom, Google Meet, and Teams, and what’s free.
In Google Meet, click Captions and translation or press c. In Zoom, click Show captions, or Request captions if the host controls them. In Teams, open More actions and select Captions. Basic captions are free in Meet and Teams, while translated captions need paid plans in all three apps.
Do you use live captions in your meetings? Which app gives you the most accurate captions in your language? Let me know by commenting below and giving this post a star rating. If you have any questions or suggestions, feel free to contact us. I’d be happy to hear your thoughts, thanks.