

Have you ever been in a virtual meeting with 30 people where only three of them ever speak?
It happens all the time. Big online meetings make most people quiet, and that’s a problem when you want real discussion, teamwork, or practice.
Breakout rooms fix this. They let the host split a meeting into smaller groups for a few minutes, and then bring everyone back together.
Teachers use them for group work, trainers for role-plays, and managers for workshops and brainstorming.
But each app handles breakout rooms differently, and on some free plans you can’t create them at all.
Don’t worry!
In this guide, you’ll learn how to use breakout rooms in Zoom, Google Meet, and Microsoft Teams, step by step, as a host and as a participant. You’ll also see which plans include breakout rooms, how many rooms you can create, and my practical tips to make group sessions run smoothly.
So, let’s get started.
What Are Breakout Rooms?
Breakout rooms are smaller, separate sessions inside a main video meeting. The host creates the rooms, puts people into them (or lets people pick), and can visit any room, send messages to all rooms, and close the rooms to bring everyone back to the main meeting.
Breakout rooms are great for:
- Online classes: Group work, peer reviews, and discussions.
- Training sessions: Role-plays, practice exercises, and case studies.
- Workshops: Brainstorming in small teams before sharing ideas with everyone.
- Networking events: Small-group introductions so people can actually talk.
- Team meetings: Splitting a big agenda so each group handles one topic.
If you teach online, our post on the benefits of virtual meetings for students explains why small-group work matters so much.
Which Plans Include Breakout Rooms?
This is the first thing to check, because it decides which app you can use.
Here’s whether you can create breakout rooms on a free or paid plan:
And here are the main breakout room limits on each platform:
| Zoom | Google Meet | Microsoft Teams | |
|---|---|---|---|
| Maximum rooms | 100 | 100 | 50 |
| Who can create rooms | Host or co-host | Host or co-host | Organizer or a breakout room manager |
| Create rooms from | Desktop app or web client | A computer | Teams desktop app |
| Pre-assign before the meeting | Yes | Yes, in Google Calendar | Yes, in the Teams calendar |
| Timer | Yes | Yes | Yes |
| Free plan | Included in Basic | Join only | Not available |
Based on the official Zoom license comparison, breakout rooms are included in the free Zoom Basic plan. In Google Meet, free personal accounts and even Google One and Google AI Pro subscribers can only join rooms, as Google’s premium features page shows. You need an eligible Google Workspace edition, such as Workspace Individual, Business Standard, or Business Plus, to create them. In Teams, you need a work or school account, and people signed in with a Teams Free account can’t be assigned to rooms.
Comparing free plans for other reasons too? Read our Zoom vs Google Meet vs Teams Free comparison.
How to Use Breakout Rooms in Zoom?
Zoom has the most complete breakout room tools, and they work on the free plan. Here’s how to use them, based on Zoom’s breakout rooms support article.
Step 1: Turn On Breakout Rooms in Your Settings
Breakout rooms need to be enabled in your account first. Sign in to the Zoom web portal, click Settings, open the Meeting tab, and under In Meeting (Advanced), turn on Breakout room. You can also check the option to let hosts pre-assign participants. If the toggle is grayed out, your admin has locked it, as Zoom explains in its enabling breakout rooms guide.
Step 2: Create the Rooms in Your Meeting
- Start your meeting as the host in the Zoom desktop app or web client.
- Click Breakout Rooms in the meeting controls. If you don’t see it, look under More.
- Choose the number of rooms you want (up to 100).
- Choose how to assign people: Assign automatically, Assign manually, Let participants choose room, or Load pre-assigned rooms.
- Click Create. The rooms are ready, but they don’t start yet.
Step 3: Set Your Breakout Room Options
Click Options (on Windows) or the gear icon (on Mac) before you open the rooms. I recommend checking these:
- Allow participants to return to the main session at any time, so people aren’t stuck if they have a question.
- Automatically move all assigned participants into breakout rooms, so nobody has to click Join.
- Auto close breakout rooms after () minutes, with Notify me when the time is up.
- Set Countdown timer, so people get a warning before they’re moved back.
Step 4: Open the Rooms and Manage Them
Click Open All Rooms. While the rooms are open, you can Join any room, use Broadcast to send a message to every room, and move people with Move To. If someone clicks Ask for Help, you’ll get a prompt to join their room.
You can even share your screen into all rooms at once. Click Share Screen, turn on Share to breakout rooms at the bottom of the share window, and click Share. That’s very handy for showing instructions to every group.
Step 5: Close the Rooms
Click Close All Rooms. Everyone gets a 60-second countdown to finish up before they return to the main meeting.
How to Pre-Assign Zoom Breakout Rooms
If you know the groups in advance, you can pre-assign participants when you schedule the meeting in the Zoom web portal, as shown in Zoom’s pre-assigning guide. This saves a lot of time in classes and workshops. Up to 1,000 participants can be pre-assigned. You can also save room assignments for a recurring meeting with a fixed schedule and reuse them later.
Good to Know About Zoom Breakout Rooms
- Participants on the Zoom mobile app can join breakout rooms but can’t manage them.
- Cloud recording only records the main room. To record a breakout room, a participant in that room needs to record to their computer with your permission. Our guide on recording Zoom meetings on a free account shows how local recording works.
- Zoom Basic meetings still end at 40 minutes, so plan short breakout sessions on the free plan.
How to Use Breakout Rooms in Google Meet?
In Google Meet, breakout rooms must be started by a host on a computer. You also need an eligible Google Workspace edition to create them. Here’s how it works, based on Google’s breakout rooms help page for hosts.
Create Breakout Rooms During a Meeting
- On your computer, start a meeting in Google Meet.
- At the bottom right, click Meeting tools, then Breakout rooms.
- Choose the number of rooms. You can create up to 100 rooms in a call.
- Meet spreads participants across the rooms. To change the groups, type a name into a room, drag and drop names, or click Shuffle to mix them randomly.
- Click Open rooms at the bottom right.
Create Breakout Rooms in Advance in Google Calendar
- In Google Calendar, create a new event or open an existing one and click Edit event.
- Add Google Meet video conferencing and your guests.
- Click Change conference settings.
- On the left, click Breakout rooms.
- Choose the number of rooms, then drag people into rooms, type their names, or click Shuffle.
- Click Save.
Tip: Invite people one by one instead of as a Google Group. Google says participants in an invited group won’t automatically be available to place into rooms.
Manage and Close Google Meet Breakout Rooms
- Set a timer: At the top of the breakout rooms panel, click Timer, set the time, and click OK.
- Change groups: Click Edit rooms, make your changes, and click Save.
- Visit a room: Click Join next to a room. Click Leave to go back to the main room.
- Answer help requests: When someone asks for help, a notice appears and you can click Join or Later.
- End the rooms: Click Close rooms, then Close all rooms. Participants get 30 seconds before they move back.
Keep in mind that Google Meet breakout rooms can’t be recorded or live streamed. You can also add up to 25 co-hosts, but only from the main meeting.
How to Use Breakout Rooms in Microsoft Teams?
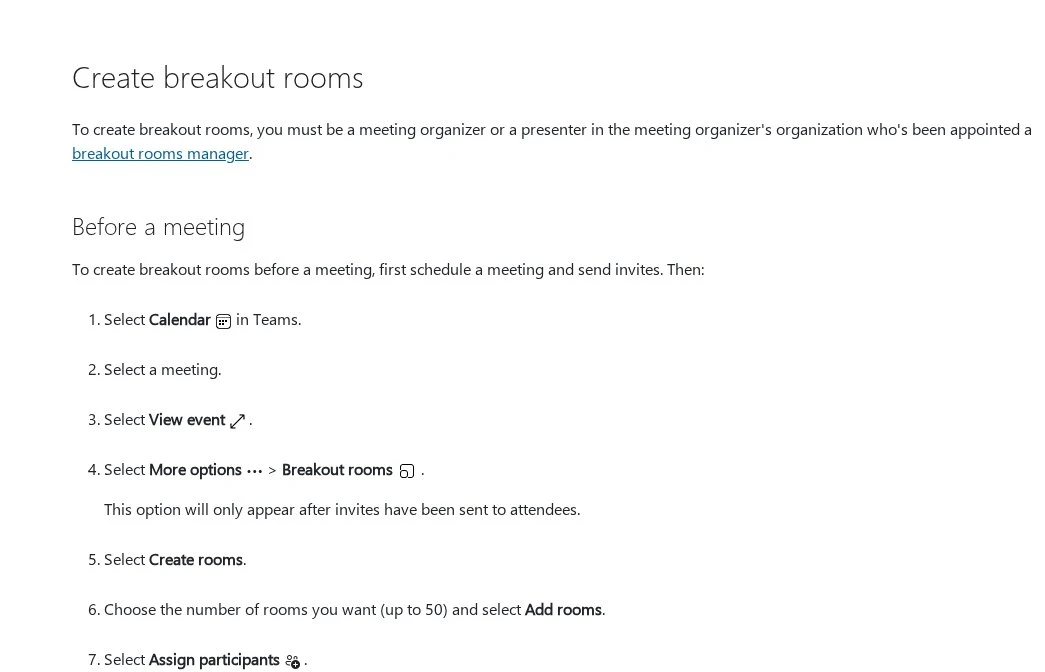
In Teams, you create and manage breakout rooms from the Teams desktop app, and you must be the meeting organizer or a presenter who has been made a breakout room manager. These steps come from Microsoft’s breakout rooms support article.
Create Breakout Rooms Before the Meeting
- Schedule the meeting and send the invites first.
- Select Calendar in Teams and select the meeting.
- Select View event, then More options > Breakout rooms.
- Select Create rooms, choose the number of rooms (up to 50), and select Add rooms.
- Select Assign participants, choose how you want to assign people, and select Next > Save.
If you need help with the first step, read our guide on how to schedule a video meeting and send the invite.
Create Breakout Rooms During the Meeting
- Select Rooms (or More actions > Rooms) in your meeting controls.
- Choose the number of rooms you want (up to 50).
- Choose how you want participants to be assigned.
- Select Create rooms.
Note that you can’t automatically assign people to rooms later in the meeting, so if latecomers join, you’ll have to assign them by hand.
Set a Time Limit and Room Managers
Select Rooms, then Rooms settings. Turn on Set a time limit and choose the time, and the rooms will close by themselves when it runs out. In the same place, you can turn on Assign presenters to manage rooms so a co-teacher or colleague can help you run the rooms.
Open, Manage, and Close the Rooms
- Open rooms: Select Rooms, then Open rooms.
- Send a message to all rooms: Select Make an announcement, type it, and select Send.
- Rename a room: Hover over the room, select More options > Rename.
- Close rooms: Select Close rooms to bring everyone back to the main meeting.
After the meeting, organizers can open the meeting chat and select Attendance to see who joined which room and when.
How to Join a Breakout Room as a Participant?
If you’re not the host, joining is easy on all three apps. When the host opens the rooms, you’ll get a prompt on your screen.
- Zoom: Click Join in the invitation (or you’re moved automatically). If the host allows it, you can choose a room yourself. Click Ask for Help to call the host into your room.
- Google Meet: Click Join in the prompt. To get help, click Ask for help at the top right. To go back early, click Return to main call. If you dialed in by phone, press *2 to move between rooms, as Google explains.
- Microsoft Teams: You’re usually moved into your room automatically. If the organizer turned that off, you’ll see a prompt to join your room yourself.
Remember that chat messages in a Google Meet breakout room are deleted when the room ends, so copy anything important before you go back.
Tips for Running Better Breakout Sessions
Creating the rooms is the easy part. Making the session useful takes a little planning. Here’s what works best in my experience:
- Give clear instructions before you open rooms: Say the task, the time, and what each group should bring back. Put it in the chat too.
- Keep groups small: Three to five people per room is the sweet spot for real discussion.
- Use a timer: All three apps have one. People work faster when they can see the clock.
- Assign roles: Ask each room to pick a note taker and a speaker who reports back.
- Visit every room: A quick check-in helps groups that are stuck.
- Use shared documents: A shared Google Doc, Word file, or whiteboard gives each group a place to write.
- Leave time to debrief: The real learning happens when groups share what they found.
Also, don’t forget the basics of virtual meeting etiquette. Ask people to keep cameras on in small rooms when they can, because it makes the discussion feel much more natural.
Conclusion:
Hopefully, this guide has shown you how to use breakout rooms in Zoom, Google Meet, and Microsoft Teams with confidence.
If you need breakout rooms on a free plan, Zoom Basic is your best choice, because it’s the only one of the three that lets free users create them. Google Meet needs an eligible Workspace edition, and Teams needs a work or school account. Once you have access, the process is quite similar everywhere: create the rooms, assign people, set a timer, open the rooms, and close them when you’re done.
I recommend doing a quick test with two or three friends before your first real session. It takes five minutes and helps you feel relaxed when the room is full. If you’re running bigger events, our guide on how to host a free webinar step by step is a good next read.
Did this guide help you run your breakout rooms? Please leave a comment below and give this post a star rating. If you have any questions or suggestions, feel free to contact us. We’ll be happy to hear your thoughts, thanks.